Wednesday, 10 December 2014
TOOTHACHE PLANT
Toothache plant (Acmella oleracea) is a species of flowering herb in the family Asteraceae. In Brazil it is called jambu.
Its native distribution is unclear, but it is likely derived from a Brazilian Acmella species. It is grown as an ornamental and it is used as a medicinal remedy in various parts of the world.
A small, erect plant, it grows quickly and bears gold and red inflorescences. It is frost-sensitive but perennial in warmer climates.
For culinary purposes, small amounts of shredded fresh toothache plant leaves are said to add a unique flavour to salads.
Cooked leaves lose their strong flavour and may be used as leafy greens. Both fresh and cooked leaves are used in dishes such as stews in Brazil.
They are combined with chilies and garlic to
add flavor and vitamins to other foods. Toothache plant prefers well-drained, black (high organic content) soil.
Toothache plant seeds are simple to grow. Sprinkle some on damp, rich soil and cover with cling-film. The seeds will take about 2-3 weeks to germinate at room temperature.
They like partially shaded sunlight. Frost will kill them though.
Sunday, 7 December 2014
SOME PEYOTE WE HAVE HERE :)
Happy caespitosa!
Peyote Cactus is a small, spineless cactus, (Lophophora williamsii), whose principal active ingredient is the hallucinogen mescaline.
Lots of clumps!
From earliest recorded time, peyote has been used by natives in northern Mexico and the southwestern United States as a part of traditional religious rites.
Peyote is also sold in Mexico as a medicine against blindness, fever and many other diseases.Although the areas Lophophora Williamsii is commonly found in are usually very dry and receive much harsh direct sunlight, the cactus itself often grows in the shade of another cactus or nearby shrub.
Healthy roots
Once Peyote reaches a diameter of around 7cm, Peyote begins producing side pups, and may eventually form large clumps. Peyote will do well in any free draining compost mix. Although to promote flowering it is recommended to add Gypsum.
Calcium is also thought to benefit Peyote. A good mix would be: 1/3 coarse sand**1/3 Perlite**1/3 Potting compost.
A couple of new babies!
Due to it's naturally slow growth rate, some growers prefer to graft Peyote onto faster growing species, such as San Pedro (trichocereus pachanoi)or a pereskiopsis species, to cut down on the time it takes to produce fully grown plants.
Peyote usually responds well to grafting, a six month old seedling, once grafted, may reach flowering size in as little as six months
This is a big improvement on conventionally grown Peyote, which may take 3 to 5 years to reach flowering size.
As with all cacti, don't graft Peyote just for the sake of it. As not all grafts are successful, it can be a terrible waste of plants.
Wednesday, 3 December 2014
MAKING YOUR OWN ABSINTHE!
"Sam Pedro's Absinthe kits work a treat! Thanks very much Sam." Charlie (Dover, UK)
Since we started making our own Absinthe kits back in 1999 we have had nothing but positive feedback from them!
The kit comprises of a pack of pre-prepared herbs, including Wormwood, Hyssop and Calamus root.
There are full instructions (detailed below) and even a couple of paper filters to get your finished result as clear as possible.
We’ve
been making absinthe kits since 1999 and our recipe has been steadily improved
over the years!
Our kit
has been tried and tested by many friends and customers
and
they have always found the flavours of the ingredients we use to be excellent.
In the
kit you will find a pack of mixed herbs and spices, including Wormwood &
Calamus
organically
grown and dried in Cornwall.
Simply add the herb mix to 1litre of 50% (100
proof)or more alcohol.
A strong rum or vodka will do.
Using
anything lower than 50% will leave your drink very cloudy.
Leave
to steep for 2-3 weeks, then strain the herbs from the liquid. Filter 2 or 3
times with the filter paper provided to attain clarity.
It’s
now ready to drink. Pour over a sugar cube using a traditional Absinthe spoon.
Please enquire for more details!
Monday, 1 December 2014
SALVIA DIVINORUM W&H STRAIN
Back in stock now after many requests!
Salvia divinorum is a psychoactive plant which can induce visions and other hallucinatory experiences.
Its native habitat is in cloud forest of Oaxaca, Mexico, where it grows in shady and moist locations.
Salvia divinorum rarely produces seed, and when it does they are nearly always sterile. That is why Salvia divinorum is usually propagated by cuttings.
Once acclimatized it can live as a normal houseplant, otherwise it needs an humid environment to mimic its natural habitat.
The W&H strain (named for R. Gordon Wasson and Dr. Albert Hoffman) is said to be the most potent of the known strains.
It is faster growing than the Blosser strain of Salvia Divinorum although its reputed to be less palatable.
We also have Blosser strain back in stock.
Saturday, 27 September 2014
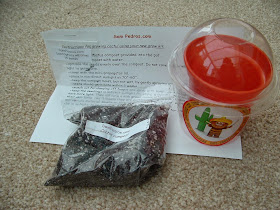
Instructions for growing cacti using your new grow kit.
Instructions
for growing cacti using your new grow kit.
Pretty much the same as our seed growing article apart from the inclusion of the mini-propagator provided in your kit.
●level down the cactus compost
provided into the pot.
●dampen the compost with water.
●sprinkle the
seeds evenly over the compost. Do not cover them with soil, they need light to
germinate.
●cover with
the mini-propagator lid.
●place in
non-direct sunlight at 70˚-80˚.
●keep the
compost moist, but not wet, by gently spraying with water when needed.
●seeds should
germinate within 2 weeks.
●watch out
for damping off fungus and spray with fungicide immediately.
●keep the
seedlings in indirect sunlight for about 6 months, then slowly let them have more light. They
will have a lush green colour if the light levels are right. If their skin
turns red it means they are getting too
much light, so shade with an appropriate material. Muslin or thin white
sheeting work well.
●be in no
hurry to re-pot them. Wait until they are fighting for room.
Wednesday, 24 September 2014
INSTRUCTIONS FOR GROWING CACTUS FROM SEED
Instructions for growing cactus from seed.
Mix 3 parts of commercial potting compost with 1 part of grit (not sand) and 1 part of perlite.
Level down into pots or a seed tray.
Soak the compost with water.
Sprinkle the seeds evenly over the compost. Do not cover them with soil, they need light to germinate.
Place in non-direct sunlight at 70-80 degrees F (21-26C)
Keep the compost moist, but NOT wet, by spraying with water when needed.
Seeds should germinate within 2 weeks.
Watch out for damping off fungus and spray with a suitable fungicide immediately.
Keep the seedlings in indirect sunlight for about 6 months, then slowly let them have more light and less humidity. They will have a lush green colour if the light levels are right. If the epidermis turns red it means they are getting too much light, so shade with an appropriate material. Muslin or thin white cloth works well for us.
Be in no hurry to re-pot them. Wait until they are fighting for room.
Horned leaves on our maeng-da kraom
Maeng-Da kratom. The legendary 'horned leaves'
Our main tree is about 2 years old now. We used to have another one but it got killed by someone's stupidity......
The horned leaves do not appear all the time. Even then, they only appear with age.
They are only now starting to show up every now & then.
The leaves also get a really nice 'frilled' look to them. Similarly, not all of them show this trait, thats why it can be tricky in identifying some Kratom strains at this age.
More frilled leaves.
Typically the main tree has really gone into overdrive, pushing out shoots and leaves a go-go, just in time for Winter! It will drop most of its leaves soon and the new shoots will go onto pause mode.
Hopefully the cuttings we have taken already will be rooted in time for winter too.
Thursday, 11 September 2014
Ephedra Sinica, joint fir, mormon tea.
Ephedra Sinica
Ephedra Sinica, joint fir, mormon tea.
They have a very odd way of germinating.
I planted 50 seeds.
The first signs of life appeared about 10 days after planting and the rest continued to germinate for the next 3 months!
No particular pattern to it, much like Where's Wally?! Every now and then I would look into the pot and find another seed had sprouted.
These are one of the slowest things we grow. Like waiting for continental drift!
The picture above shows some of them at about 10 months old!!
They grow about an inch, then seem to stop, change direction and start on again for another inch.
E.Sinica seems to like dryish compost, with good drainage and lots of direct sun.
Kanna (Sceletium tortuosum)
Kanna
Kanna (Sceletium tortuosum)
Used by African tribes as a mood-altering substance for thousands of years, this succulent is easy to grow, pretty to look at and a great talking point..The flowers seem to smell sweet/citrus when there are lots of them together, but on their own they are too small to smell.Cuttings are super easy to root, just dip them in rooting powder, put them in damp compost/vermiculite/perlite mix (1:1:1) and keep misted.They will look like they are going to die, they might wilt or go interesting colours but then they pick up and start pushing out new leaves.Ive only had one or two fail out of the many hundreds i have rooted.We always have un-rooted cuttings of Kanna for sale and often have rooted ones too.
Salvia Divinorum, Blosser strain.
Salvia divinorum 'Blosser'
Salvia Divinorum, Blosser strain.
Originally, when i ran the-mush-room, I brought this strain into the UK from the USA in 2010.
As far as I know we were the only company selling Blosser here for quite a while. Most of the Blosser available now in the UK originated from our mother plant!
Blosser is said to be the 'palettable' strain, although after tasting it I would disagree! Its as bitter as any other.
Much slower growing and slower to root than the Wasson and Hoffmaan strain we also have.
Blosser never used to be that common in the UK or Europe at all, more common in the USA.
Leaves tend to have more of a serrated edge to them and white central veins on the leaves.
The Blosser above has been trimmed to look more like a bush than a standard tall Salvia.
Reed canary grass (Phalaris arundinacea)
reed canary grass
Reed canary grass (Phalaris arundinacea)
Sowed in late Summer 2014 and doing nicely.
Surface sow onto moist compost/vermiculite/perlite (1:1:1), mist and cover with cling film.Took about 2 weeks to germinate and has been going crazy ever since.Dies down over winter and will happily survive the harshest of UK conditions outside.When its dies down over winter, I usually flame it to burn the stubble. Seems to like this, as it shows.If we put this into the ground it would reach 2-3 meters in height, but as we ship these all over the world we keep them small, so you can plant them.
Leaves of Reed canary grass contain DMT, 5 MeO DMT and related compounds. Levels of beta carbolines and hordenine have also been reported.
They are invasive, so dont plant them anywhere that this may cause problems.
Sea bean (entada rheedii) germination TEK
Sea beans have a hard shell to allow them to survive being washed up on beaches where they can germinate. Germinating them can be difficult, but hopefully, using this TEK you might enjoy the same success as we have.
Drill into the bean at the point where it was attached to the pod (its belly button), using a flat tipped 5-6mm drill and a hand brace & bit. If you use a mechanical drill you may cause damage to the germ in the shell. We held the seeds in a vice, but took care not to tighten it too much as they can crack. Only drill as far in, until you can see the white pulp in the seed. (maybe 3-4mm deep, depending on the size of the seed).
Take an OLD flask and fill it with boiling water. (it will have to be smashed to get the swollen beans out again, so dont bother using a new one!)
Make sure that the beans fit through the neck of the flask! If they dont, you will need a bigger flask. (We use a flask because it keeps the water hotter overnight.)
Our beans nearly got stuck on the way in! Once they have soaked for upto 12 hours in the flask, you will have to smash the flask to remove them, as they will have swelled up considerably. Do this carefully as a vacuum flask will often explode sneding shards of glass everywhere (as we found to our dismay!)
The next step is to try to recreate the beach they will germinate upon. We used perlite, but washed sand will work fine. Make sure it is nice and wet and warm and mist regularly. Cover with Cling-film (Saran-wrap) to keep the humidity high. Make sure they are in a bright place, as they need the light to help them pop!
After about 20-30 days they will have cracked open, like a clam shell, from the hole you drilled. The root will start to find its way down and the shoot will head toward the light. Put them back in their 'faux beach' pot for another few weeks and then pot in a mix of compost/perlite/vermiculite (1:1:0.5). They need reasonable humidity, lots of light and plenty of fresh air as they can be susceptable to rot.
My salvia arrived in the post. What do I do now?
This is a question we get asked quite a bit.
When your salvia arrives it will be in a plant-pak to protect it from the post and to keep it humid.
Unpack it gentely and pot it into a mix of compost, perlite and vermiculite (1:1:1) I have used a small pot here just for demonstration purposes, but as long as the pot you use fits inside the bottle, all will be well.
Snip the bottom off a clear plastic bottle, place the pot on a tray or saucer and gentely lower the bottle over the salvia. mind those rough bottle edges on the leaves now!
Mist the plant and leave at room temperature in the light. Not direct sun as this will cause the bottle over-heat and kill your new Salvia Divinorum plant.
Every now and then (I usually do it when I walk past the bottle) lift the bottle for a minute or two to let some fresh air in, otherwise the air will stagnate and mildew will start.
After a couple of days remove the lid. This will lower the humidity and help to acclimatize your plant to your home. Still remembering to lift the bottle as you think about it. A couple of times a day should be fine for now.
After about a week of no lid and lifting the bottle, remove the bottle completely and mist.
If your salvia starts to wilt within an hour or so, put the bottle back on and carry on with the acclimatizing process for a few more days. Soon she will be happy to live out of the bottle in the lower humidity of your home.
Salvia divinorum likes damp (but not soggy) roots and an occasional misting. Direct sun will cause her to wilt and frost will kill her. During the winter, in the UK especially, she will slow her growth and some of the leaves will develop brown tips. This is perfectly normal and she will pick up again in spring.
Germinating Baby Hawaiian Woodrose seeds.
Nice simple TEK this one!
I have been asked a few times this week how to germinate these little blighters. So i thought this would be the best way to explain,
As you can see, Hawaiian Baby Woodrose seeds are not tiny, but small enough to be a bit fiddly, especially if you have big hands!
The seed has a round and a pointed end.
Snip the point off the pointed end to help the seed germ break free, as the shell is quite a tough one!
Then plant in damp vermiculite, about 1/2 inch deep. It dosen't matter what way up you plant it.
Cover with cling film (saran wrap) or a clear plastic food bag and keep at about 75 Degrees F.
Seed will take about 5-10 days to pop.
When the seedling is about 2" tall, re-pot into compost/vermiculite/perlite (1:1:1) mix and put in a sunny spot. (Try and avoid direct sun until the plant is established)
Germinating mimosa hostilis seeds
With a little practice and fresh seeds you should be able to get a 99% success rate!
Gently make a nick or a scratch in the end of the seed. This is to help the seedling escape from its hard shelled seed-prison! We have a nice clean, sharp pair of nail scissors we use!
Boil a cup of water and allow it to cool for 10 minutes. Just enough to be able to dip your finger in.
It should still be very hot tho. Put the seeds in the water, they should sink. If they float, try making the nick on your seeds a little deeper. (not too deep though as this could harm the seed germ.) Leave them in to soak in the hot water for about 45 minutes. You will notice that they have swelled up slightly.
Place the swollen seeds in a pot of damp vermiculite (we use plant pods because they are so easy and germination friendly). Just place the seeds on top of the vermiculite, they need light to germinate. Lightly mist and cover with cling film or put the plant pod lid on.
Within two weeks the seeds will have started to germinate, but they are too small just yet, to replant. Instead, leave them in their vermiculite until they have pushed out their first set of leaves.
After another week, or when the first set of leaves have opened, the seedlings can be re-potted into a mix of compost, perlite and vermiculite (1:1:1) and placed in a propagator in a warm place (about 70 degrees F) and exposed to light, but not direct sun. (This can damage the seedlings at this size)
Wednesday, 10 September 2014
PSYCHOTRIA LEAF CUTTINGS
Here is a super-simple guide to making clones of any psychotria leaf.
This works with psychotria alba, viridis and carthagenensis.
It may well work with others, I haven't tried it.
Snap the leaf's spine 4 or 5 times
Wrap the snapped leaf in damp kitchen paper
Put the damp paper/leaf combo in a ziploc baggie
Leave in a warm place & open every few days to allow for fresh air exchange.
That really is it. In the picture above you can see I'v done just that with a psychotria alba leaf.
Roots have begun to form at the snapped points.
Simply break the leaves up at the rooted cuts and pot into an humidity dome or similar.
Each leaf section can produce upto 8 new plants!
UPDATE 30/12/15
Here are some more psychotria pics. These are Alba, viridis and the psychotria hybrid 'nexus'
They have all been grown using this TEK...
Try it and see what you think!
Have fun :)
Tuesday, 9 September 2014
STARTING ALL OVER AGAIN
Hello again my friends!!
Its been quite a while since i had time to blog anything, so I figured I'd give you all an update on what is happening in the wonderful world of Sampedros.com
As you may remember we moved (my familly, plants, dog & I) to Spain. Although it was great and we all miss Valencia loads, due to unforseen family complications we had to return.
But enough of that.
Since I sold the-mush-room.co.uk last year I have had THOUSANDS of enquiries asking for Salvia divinorum, both active and edible spores, exotic, rare and interesting seeds and plants alike; So I have decided to re-open the now defunct mush-room again, under the umbrella of Sam Pedro's Ethno Emporium!
We have a new logo (well V2.0) to go with our new direction...
which I'm sure you will agree looks fine and funky! If you want some stickers please email me and I'll get some out to you!
So what is new about Sam Pedro'?
Funny you should ask. Over the coming weeks we will be building up our stock of non-cactus seeds and live plants, including two strains of Salvia Divinorum, Kratom & various shamanic and ornamental herbs and seeds. Since we have been collecting these since the mid 90's, we have more than a little experience and will be able to help you achieve the incredible garden you deserve.
We will be sending out a monthly newsletter too, so if you wish to receive one, please sign up for it on the home page of our site .
This blog will also get regular updates AND there will be our own You Tube channel where there will be instructions and teks and plant videos
Finally may I wish all our valued customers and friends much love and happiness in their gardening efforts.
All the best
Sam.
Sunday, 27 April 2014
A brief history of the world. (of sam pedro's)
Welcome to the official blog of www.sampedros.com
We specialise in ceremonial and ornamental cacti, mainly of the Lophophora and Trichocereus genus.
My name is Chris. I have been growing psychoactive cacti since 1999 when I bought some peyote seeds. They failed miserably because my heating mat cooked them! Fortunately the vendor I bought them from was most understanding of my inexperience and sent me some more.
I also purchased a 5 year old Lophophora williamsii at the same time so I didnt have to wait to actually 'own' my first one! Bit of a cheat I know, but I was all excited. Turns out that growing these cacti is an addictive hobby.
I only grow them. I don't ingest them in any way. I wouldn't want to as I have grown close to them all now!
I built/started/designed and ran the psychoactive plant shop the-mush-room in 1999 and continued to do so until September 2013 when I sold it to its current owner.
I kept all the cacti in my collection though, just couldn't part with them!
Sam Pedro's. A brave new world of Ceremonial cacti.
My wife and I started Sam pedro's in January of 2014 as a way of paying for my ever-expanding cactus collection. With much help from Jon at Sharkfin media in Truro, I think we now have a great selection of cacti and seeds and a lovely webstore to boot!
Moving to Spain
In this blog I will also be detailing out move from Cornwall in the UK to Murcia in Spain.
We will be driving down on 5th May and we intend to run Sam pedro's from there.
The cacti will grow much bigger, better and faster in the 340 days of sunshine per year, meaning that we will be able to continue supplying some of the world's most unique, rare active and downright amazing cacti, both wholesale and retail to the whole world!
The tales I tell of our move are not intended as a 'moving to Spain bible' by any means, just an insight into how we are doing it & how it goes.
Thanks for reading, please feel free to comment or give me feedback.
My email address is chris@sampedros.com